Thursday, November 26, 2009

INSTALL MOD SECURITY ModSecurity (Web Application Firewall)

I/INTRO

ModSecurity is an open source intrusion detection and prevention engine for web applications. It operates embedded into the web server, acting as a powerful umbrella – shielding applications from attacks. ModSecurity supports both branches of the Apache web server.

The module filters, and optionally rejects, incoming requests based on a number of different criteria like CGI variables, HTTP headers, environment variables, and even individual script parameters. mod_security can also create an audit log, storing full request details in a separate file, including POST payloads (the audit feature can be turned on or off on a per-server or per-directory basis).

II/INSTALL


Step 1:You need install Microsoft Visual C++ 2008 Redistributable Package (x86) (if you use Apache in window).

If you use LINUX.you can install from source as:

#wget http://www.modsecurity.org/download/modsecurity-apache_2.5.11.tar.gz

#tar -xvzf modsecurity-apache_2.5.11.tar.gz

#cd modsecurity-apache_2.5.11

#./configure;make;make install

you can install It by yum if you use RHEL or CENTOS

prefer:http://www.jasonlitka.com/yum-repository/


Step 2:Configure

copy libxml2.dll to folder bin in folder Apache(/etc/httpd/)if you use window

Step 3:edit file httpd.conf

uncommend

  LoadModule unique_id_module modules/mod_unique_id.so 

Add this line at the bottom of Load Modules section:
LoadModule security2_module modules/mod_security2.so

Step 4:Test you change signature"SecServerSignature "IIS/7.5" " of webserver to IIS/7.5 and access to apache


Thursday, November 19, 2009

INSTALL hMailServer

I/INTRO

hMailServer is a free e-mail server for Microsoft Windows. It's used by Internet service providers, companies, governments, schools and enthusiasts in all parts of the world.

It supports the common e-mail protocols (IMAP, SMTP and POP3) and can easily be integrated with many existing web mail systems. It has flexible score-based spam protection and can attach to your virus scanner to scan all incoming and outgoing email.

prefer:http://www.hmailserver.com/

II/Functionality

1/Services(POP3,STMP,IMAP)
2/database support(Microsoft SQL Server, PostgreSQL and MySQL)
3/
webmail(you can use Roundcube,SquirrelMail ,AfterLogic WebMail Pro)
4/Security(hMailServer is pre-configured to have high security when it comes to relaying and authentication so that no one can use your server to send spam messages. It also supports the very popular open source virus scanner ClamAV. Configuring hMailServer to use ClamAV only takes a single click! The server also supports black list servers and other spam-stopping mechanisms such as SPF and MX lookups).
5/feature
* POP3, SMTP, IMAP
* Virtual domains
* Built-in backup
* SSL encryption
* Anti-spam
* Anti-virus
* Scripting
* Server-side rules
* Multilingual
* Routing
* MX backup
* Multihoming
* SQL backend
* Web administration
* ClamWin
* SpamAssassin
6/other(hMailServer can use account of Active directory)

III/INSTALL

Step 1:download hmail server from

http://www.hmailserver.com/index.php?page=download

Step 2:Install hmail server (it auto install)

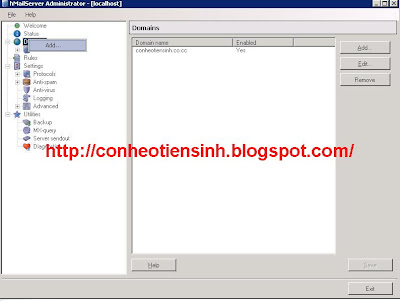
Step 3: After install add domain(conheotiensinh.co.cc)


Step 4:Add Account you can use account of AD

Step 5:install web admin and Web mail


For easier install you can use xampp(http://www.apachefriends.org/en/xampp.html)


1/Web admin
- Copy folder PHPWebAdmin from in folder install hmailServer to folder htdocs of xampp
-Set the value of rooturl to the URL where the WebAdmin will be accessed.

Example:
$hmail_config['rooturl'] = "http://localhost/PHWebAdmin/";
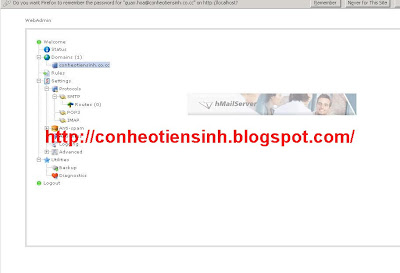


2/Webmail
a/use SquirrelMail
Download It from (http://www.squirrelmail.org/download.php).In your mail folder, you will found a config folder with a file named config_default.php. Rename the config_default.php to config.php.Edit it

$domain
= "localhost"; $smtpServerAddress = "localhost"; // your hMailServer address $imapServerAddress = "localhost"; // your hMailServer address $imap_server_type = "hmailserver";
$data_dir = "C:/xampp/htdocs/mail/data/";
$attachment_dir
= "C:/xampp/htdocs/mail/attach/"

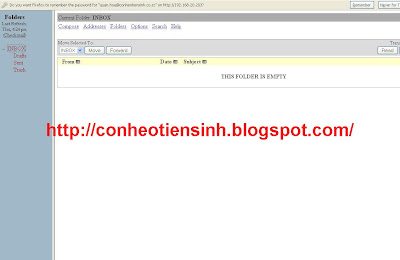
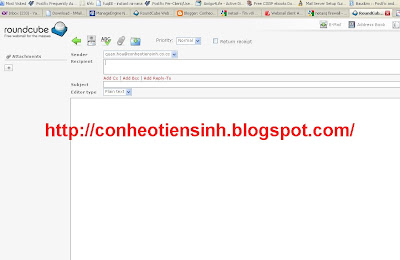
b/Use roundcube(recommend)
-Download from http://roundcube.net/
-Create database roundcubemail from phpmyadmin
-Rename your “db.inc.php.dist” to “db.inc.php” and “main.inc.php.dist” to “main.inc.php” in folder config of roundcube
-Edit your “db.inc.php” and change this line “$rcmail_config['db_dsnw'] = ‘mysql://roundcube:pass@localhost/roundcubemail’;” with this “$rcmail_config['db_dsnw'] = ‘mysql://root:@localhost/roundcubemail’;
-access http://localhost/roundcubemail/installer and configure it


c/use AfterLogic WebMail Pro(not recommend Buy Liscense)

- Download from http://www.afterlogic.com/

-Access http://your_webmail_web_address/adminpanel/install.htm you will install it auto

Friday, November 13, 2009

VPN IPSEC SITE TO SITE WITH PFSENSE

I/INSTALL


you need install pfsense with info:


Site 1: Outside IP: 192.168.20.203/24
Outside Gateway: 192.168.20.254
Inside IP: 172.16.1.0/16

Site 2: Outside IP: 192.168.20.83/24
Outside Gateway: 192.168.20.254
Inside IP: 172.16.10.0/24


Step 1: Install pfsense and set local IP’s on both firewalls.

Step 2: Logon to the web interface for pfsense on each box and assign the WAN addresses.

Step 3: Enable IPSEC (VPN->IPSEC->Enable IPSec). Do this on both firewalls.

Step 4: Add a tunnel on Site 1’s firewall to Site 2 by adding a tunnel and changing only the following items:
* Remote Subnet: 172.16.10.0/24
* Remote Gateway: 192.168.20.83
* Phase 1 Lifetime: 28800
* PreShared Key: conheotiensinh
* PFS Key Group: 2
* Phase 2 Lifetime: 3600

Step 5: Add a tunnel on Site 2’s firewall to Site 1 by adding a tunnel and changing only the following items:
* Remote Subnet: 172.16.1.0/16
* Remote Gateway: 192.168.20.203
* Phase 1 Lifetime: 28800
* PreShared Key: conheotiensinh
* PFS Key Group: 2
* Phase 2 Lifetime: 3600

Step 6: "Apply Changes”

Step 7: Allow Authenticated Headers (TCP/51) and ISAKMP (UPD/500) with Firewall rules so that IPSEC can pass. Firewall->Rules: WAN Tab.
Rule 1
* Source IP: Any
* Destination IP: WAN Address
* Protocol: TCP
* Port: 51

Rule 2
* Source IP: Any
* Destination IP: WAN Address
* Protocol: UDP
* Port:500

Do this on both firewalls and Apply Changes when prompted

Step 8: Allow all traffic to pass through the IPSEC tunnel. Firewall->Rules : IPSEC Tab
Rule
* Source IP: Any
* Destination IP: Any
* Protocol: Any
* Port Range: Any

II/TEST

ping test connection from local in site 1 to site 2 and site 2 to site 1

Tuesday, November 10, 2009

SETUP VPN(PPTP SERVER) WITH PFSENSE

I/INTRO


PPTP works by sending a regular PPP session to the peer with the Generic Routing Encapsulation (GRE) protocol. A second session on TCP port 1723 is used to initiate and manage the GRE session. PPTP is difficult to forward past a network firewall because it requires two network sessions. As such, firewalls are unable to let pass this traffic flawlessly, resulting in an inability to connect.

II/ INSTALL

We need install pfsense with 2 interface

Wan interface:192.168.20.203
Lan interface:172.16.1.1

Step 1: Enable PPTP Server (VPN > PPTP).Setup as Image


*Redirect incoming PPTP connections to:If check you will redirect to other PPTP Server(Example Window PPTP)
*Use a RADIUS server for authentication:used Account of Radius(AD,FreeRadius...)

Step 2: create Account for access VPN (click tab users)

Step 3:create Rule for VPN Zone access internet


Step 4: connect to PPTP with ip:192.168.20.203 and test connection

Monday, November 9, 2009

INSTALL IPS(SNORT) WITH PFSENSE

I/INTRO

Pfsense use snort as IPS( Snort Used by fortune 500 companies and goverments Snort is the most widely deployed IDS/IPS technology worldwide. It features rules based logging and can perform content searching/matching in addition to being used to detect a variety of other attacks and probes, such as buffer overflows, stealth port scans, CGI attacks, SMB probes, and much more. )

II/INSTALL

In This lab we need setup network with info:

Wan Interface:192.168.20.203
Lan Interface:172.16.1.1


STEP 1:Install pfsense as ip
STEP 2:Install snort(The package is available to install from System > Packages and you must only install SNORT or SNORT_DEV never both. It is strongly suggested you get a paid subscription form www.snort.org in order for you to download the latest rules. )
STEP 3:After Install done We configure snort(Services > Snort)click tab Setting and configure as image


Notes:

Block offenders:Pfsense will automatically block hosts that generate a snort alert
Remove blocked hosts every: It Will auto remove hosts from tab blocked
Oinkmaster code:you need register 1 Account in Snort or buy (http://www.snort.org/vrt/buy-a-subscription/ will get the the latest rule updates 30 days faster than registered users)


Step 4:click tab update rules(please waith about 4-10 minutes)

Step 5:Test before attack(ping external ip)


Step 6:user super scan tool scan ip external and check tab blocked


Step 7 :access agian ip external

Step 8:Delete ip attacker in tab blocked and test again


Beside You can use Blocking Skype ,Yahoo ,P2P.... with pfSense and Snort.I will intro later